OpenStack is a free and open-source software platform which provides IAAS (infrastructure-as-a-service)for public and private clouds.
OpenStack platform consists of several inter-related projects that control hardware, storage, networking resources of a datacenter, such as: Compute, Image Service, Block Storage, Identity Service, Networking, Object Storage, Telemetry, Orchestration and Database.
Lets get started.
Deploy a KVM Guest with 8GB RAM and 4CPU
Install CentOS7, DO not install any other software.
Update
yum update -y
Install packages:
yum install nano bash-completion net-tools wget curl lsof -y
Next, issue the ss -tulpn command to list all running services.
netstat -tulpn 	## To output numerical service sockets
netstat -tulp		## To output literal service sockets
Next, identify, stop, disable and remove unneeded services, mainly postfix, NetworkManager and firewalld. At the end the only daemon that would be running on your machine should be sshd. (Note: very important!)
systemctl disable firewalld
systemctl stop firewalld
systemctl disable NetworkManager
systemctl stop NetworkManager
systemctl enable network
systemctl start network
Completely disable Selinux policy on the machine by issuing the below commands. Also edit /etc/selinux/config file and set SELINUX line from enforcing to disabled as illustrated on the below screenshot.
setenforce 0
SELinux is disabled
getenforce
Disabled
Also edit /etc/selinux/config file and set SELINUX line from enforcing to disabled as illustrated below.
# This file controls the state of SELinux on the system.
# SELINUX= can take one of these three values:
#     enforcing - SELinux security policy is enforced.
#     permissive - SELinux prints warnings instead of enforcing.
#     disabled - No SELinux policy is loaded.
SELINUX=disabled
# SELINUXTYPE= can take one of three values:
#     targeted - Targeted processes are protected,
#     minimum - Modification of targeted policy. Only selected processes are protected.
#     mls - Multi Level Security protection.
SELINUXTYPE=targeted
Reboot the System
shutdown -r now
On the next step using the hostnamectl command to set your Linux system hostname. Replace the FQDN variable accordingly. Name the host with a fully qualified domain name rather than a short-form name to avoid DNS issues with Packstack.
hostnamectl set-hostname cloudhost.me.lan
Finally, install ntpdate command in order to synchronize time with a NTP server on your premises near your physical proximity.
yum install ntpdate -y
Install OpenStack with PackStack Package
PackStack deploys different components of OpenStack on CentOS and Red Hat Enterprise Linux (RHEL) servers. First, we need to enable the RDO (RPM Distribution of OpenStack) repository with this command.
yum install https://www.rdoproject.org/repos/rdo-release.rpm -y
When prompted, press y and then Enter to get the result below.
Running transaction
Installing : rdo-release-train-1.noarch 1/1
Verifying : rdo-release-train-1.noarch 1/1
Installed:
rdo-release.noarch 0:train-1
Complete!
Now use yum to install the PackStack package. The output for this command will be relatively large.
yum install openstack-packstack -y
After the output below appears, press y and then Enter.
Retrieving key from file:///etc/pki/rpm-gpg/RPM-GPG-KEY-CentOS-SIG-Cloud
Importing GPG key 0x764429E6:
Userid : "CentOS Cloud SIG (http://wiki.centos.org/SpecialInterestGroup/Cloud) security@centos.org"
Fingerprint: 736a f511 6d9c 40e2 af6b 074b f9b9 fee7 7644 29e6
Package : rdo-release-train-1.noarch (@/rdo-release)
From : /etc/pki/rpm-gpg/RPM-GPG-KEY-CentOS-SIG-Cloud
Once the key is retrieved, you will see the below output, which indicates the PackStack package has been installed.
Installed:
openstack-packstack.noarch 1:15.0.1-2.el7
Complete!
Create a Configuration File
To generate a configuration file within PackStack, run the following command.
packstack --gen-answer-file=$(date +"%d.%m.%y").conf
This command will make sure the generated file includes the date of creation, as is shown below.
Packstack changed given value to required value /root/.ssh/id_rsa.pub
Additional information:
Parameter CONFIG_NEUTRON_L2_AGENT: You have chosen OVN Neutron backend.
Note that this backend does not support the VPNaaS or FWaaS services.
 Geneve will be used as the encapsulation method for tenant networks
Note:
The parameter CONFIG_NEUTRON_L2_AGENT will appear to all users following this
guide and is normal.
Find your newly created configuration file by using the ls command.
As shown below, our configuration file is 10.10.23.conf
# ls
 22.10.23.conf
Edit Configuration File
Now we will use a text editor to edit the configuration file. Open the 22.06.21.conf file and update any lines containing passwords where appropriate.
nano 22.10.23.conf
Next, set your public NTP server to a location close to you. In our below example, we chose the United States pool zone.
CONFIG_NTP_SERVERS=0.us.pool.ntp.org
Update the remaining parameters as shown below but incorporating your own passwords.
CONFIG_PROVISION_DEMO=n
CONFIG_KEYSTONE_ADMIN_PW=TeStPASSword234
CONFIG_HORIZON_SSL=y
CONFIG_MARIADB_PW=TeStPASSword234
After editing, save and close the file with the :wq command in your editor.
Lastly, update the file to allow root login. Open the file with the editor.
nano /etc/ssh/sshd_config
A line of code beginning with the pound sign (#) is a comment within the code and not read by the system. Remove the pound sign in front of the PermitRootLogin yes line to make it active, as shown below. Save your changes once complete.
#LoginGraceTime 2m
PermitRootLogin yes
#StrictModes yes
#MaxAuthTries 6
#MaxSessions 10
Lastly, restart the SSH daemon.
systemctl restart sshd
How to Install OpenStack
Finally, we can start the OpenStack Installation. Use the configuration file just edited and run the below command.
packstack --answer-file 22.10.23.conf
The install process will take some time, but you will see various services installed throughout the process. The generated output is shown below.
The installation log file is available at: /var/tmp/packstack/20231022-085402-SuY6w5/openstack-setup.log

Installing:
Clean Up                                             [ DONE ]
Discovering ip protocol version                      [ DONE ]
Setting up ssh keys                                  [ DONE ]
Preparing servers                                    [ DONE ]
Pre installing Puppet and discovering hosts' details [ DONE ]
Preparing pre-install entries                        [ DONE ]
Installing time synchronization via NTP              [ DONE ]
Setting up CACERT                                    [ DONE ]
Preparing AMQP entries                               [ DONE ]
Preparing MariaDB entries                            [ DONE ]
Fixing Keystone LDAP config parameters to be undef if empty[ DONE ]
Preparing Keystone entries                           [ DONE ]
Preparing Glance entries                             [ DONE ]
Checking if the Cinder server has a cinder-volumes vg[ DONE ]
Preparing Cinder entries                             [ DONE ]
Preparing Nova API entries                           [ DONE ]
Creating ssh keys for Nova migration                 [ DONE ]
Gathering ssh host keys for Nova migration           [ DONE ]
Preparing Nova Compute entries                       [ DONE ]
Preparing Nova Scheduler entries                     [ DONE ]
Preparing Nova VNC Proxy entries                     [ DONE ]
Preparing OpenStack Network-related Nova entries     [ DONE ]
Preparing Nova Common entries                        [ DONE ]
Preparing Neutron API entries                        [ DONE ]
Preparing Neutron L3 entries                         [ DONE ]
Preparing Neutron L2 Agent entries                   [ DONE ]
Preparing Neutron DHCP Agent entries                 [ DONE ]
Preparing Neutron Metering Agent entries             [ DONE ]
Checking if NetworkManager is enabled and running    [ DONE ]
Preparing OpenStack Client entries                   [ DONE ]
Preparing Horizon entries                            [ DONE ]
Preparing Swift builder entries                      [ DONE ]
Preparing Swift proxy entries                        [ DONE ]
Preparing Swift storage entries                      [ DONE ]
Preparing Gnocchi entries                            [ DONE ]
Preparing Redis entries                              [ DONE ]
Preparing Ceilometer entries                         [ DONE ]
Preparing Aodh entries                               [ DONE ]
Preparing Puppet manifests                           [ DONE ]
Copying Puppet modules and manifests                 [ DONE ]
Applying 192.168.0.211_controller.pp
Testing if puppet apply is finished: 192.168.0.211_controller.pp  [ - ]
It may appear that this is stopped at this point…”Testing if puppet apply is finished: 192.168.0.211_controller.pp [ – ]”
This can take up to 30 minutes. If it takes a very long time, it may be frozen. Hit Ctrl-c and check the configuration.
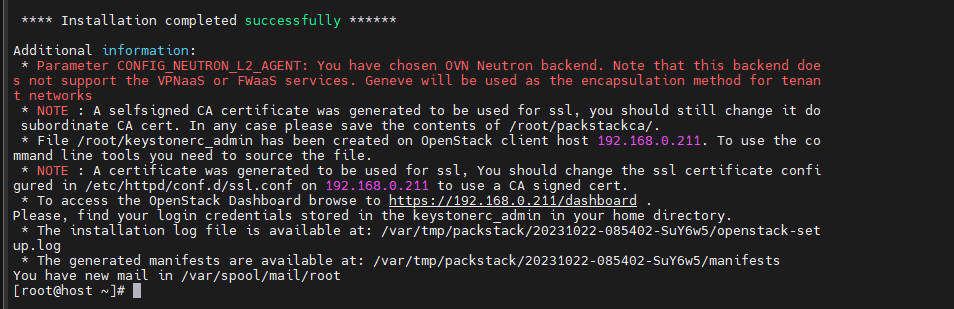
When the install finishes:
 **** Installation completed successfully ******

Additional information:
 * Parameter CONFIG_NEUTRON_L2_AGENT: You have chosen OVN Neutron backend. Note that this backend doe                                                                                                                                 s not support the VPNaaS or FWaaS services. Geneve will be used as the encapsulation method for tenan                                                                                                                                 t networks
 * NOTE : A selfsigned CA certificate was generated to be used for ssl, you should still change it do                                                                                                                                  subordinate CA cert. In any case please save the contents of /root/packstackca/.
 * File /root/keystonerc_admin has been created on OpenStack client host 192.168.0.211. To use the co                                                                                                                                 mmand line tools you need to source the file.
 * NOTE : A certificate was generated to be used for ssl, You should change the ssl certificate confi                                                                                                                                 gured in /etc/httpd/conf.d/ssl.conf on 192.168.0.211 to use a CA signed cert.
 * To access the OpenStack Dashboard browse to https://192.168.0.211/dashboard .
Please, find your login credentials stored in the keystonerc_admin in your home directory.
 * The installation log file is available at: /var/tmp/packstack/20231022-085402-SuY6w5/openstack-set                                                                                                                                 up.log
 * The generated manifests are available at: /var/tmp/packstack/20231022-085402-SuY6w5/manifests
You have new mail in /var/spool/mail/root
File /root/keystonerc_admin has been created on OpenStack client host 192.168.0.81. To use the command line tools you need to source the file.
source keystonerc_admin
Test CLI. Here is a cheat sheet for cli.
https://docs.openstack.org/ocata/user-guide/cli-cheat-sheet.html
openstack user list
+----------------------------------+------------+
| ID                               | Name       |
+----------------------------------+------------+
| 43c97c79626e43a6acc4db8ddde8f854 | admin      |
| f0e830f6433742c9b5a3892e90f8bbc0 | glance     |
| 6082f0ce5b9649799e533e3880455c82 | cinder     |
| ac52758b69db415b95bb6d497e940192 | nova       |
| ecbf8b86db864cf1aebba57b317594df | placement  |
| 4868960c806c42dca2f41ba983f717a1 | neutron    |
| 4cf4ed45534e4461a387401240f20395 | swift      |
| 0779b067bd5a447fafd4e6a43501cc94 | gnocchi    |
| 9ccb88f0e89a47f58d21164081b9fa95 | ceilometer |
| 785fd64c82e54b41be1542a4ce5acd68 | aodh       |
+----------------------------------+------------+
Launch the OpenStack Dashboard
Type in the following into your browser. Replace the IP address shown below with your own.
https://192.168.0.211/dashboard
The OpenStack login screen will appear.
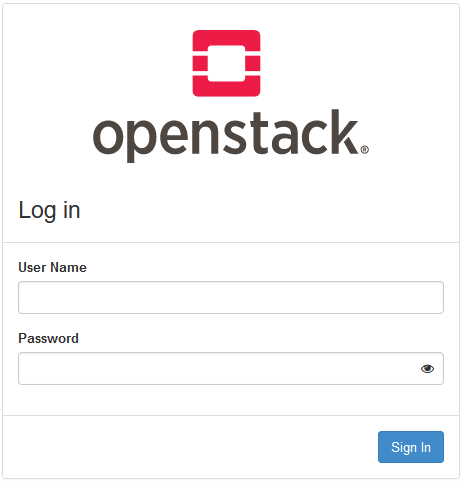
Input admin as the username and the password established in the configuration file. Click Sign In.
Note:
If you can’t remember your password, find it in the keystonerc_admin file, located in the directory in which you installed OpenStack.
A successful login will show the OpenStack dashboard.
Conclusion
You have completed the installation of OpenStack on your server successfully! Our fully-managed cloud hosting is built on OpenStack technology, making the deployment of scalable, load-balanced server clusters a breeze! Reach out to us today to help you choose the cloud server that is right for you.
Next, we install a bridge for networking.